jcgriff2
Co-Founder / Admin
BSOD Instructor/Expert
Microsoft MVP (Ret.)

If your BSODs are software related, Driver Verifier can help by subjecting 3rd party (non-Microsoft) drivers to a variety of stresses and tests to find improper behavior to hopefully find the rogue driver that is causing your BSODs.
Driver Verifier monitors kernel-mode drivers and graphics drivers (it does not monitor pure user-mode drivers) to detect illegal function calls or actions that might corrupt the system.
If Driver Verifier detects a driver violation, it will flag (disable) the offending driver and force a BSOD. The additional info added to the memory dump file will hopefully yield clues as to the cause.
Driver Verifier is a very useful troubleshooting tool when used correctly, however, these instructions should only be followed with the supervision of an experienced analyst. They have been written with Windows 11 machines in mind and therefore some of the settings may have been excluded due to deprecation from Microsoft. The general recommendation is to run Driver Verifier for between 24-48 hours or until a Driver Verifier related crash is thrown.
These are the following:
- STOP 0xC1: SPECIAL_POOL_DETECTED_MEMORY_CORRUPTION
- STOP 0xC4: DRIVER_VERIFIER_DETECTED_VIOLATION
- STOP 0xC6: DRIVER_CAUGHT_MODIFYING_FREED_POOL
- STOP 0xC9: DRIVER_VERIFIER_IOMANAGER_VIOLATION
- STOP 0xD6: DRIVER_PAGE_FAULT_BEYOND_END_OF_ALLOCATION
- STOP 0xE6: DRIVER_VERIFIER_DMA_VIOLATION
Step 1:
Create a Windows System Restore Point -
Vista - START | type rstrui - create a restore point
Windows 11, 10 & 7 - START | type create | select "Create a Restore Point"
Windows 8/ 8.1 - Windows System Restore - Create a Restore Point (Windows 10, 8.1, 8, 7 & Vista)
Do Not Forget To Create a System Restore Point
I cannot stress the importance enough about the need to create a system restore point!
If Driver Verifier flags a boot driver then you may find yourself in a boot loop and unable to boot your system. If you find yourself in this predicament, then please read the instructions at the end of this tutorial.
Step 2:
Run Driver Verifier -
Windows 11, 10, 7 & Vista - START | type verifier
Windows 8.1 & 8 - Press WIN +X keys | select "Command Prompt (Admin)" | type verifier
Step 3:
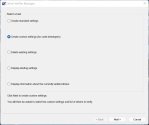
a. Please select the option called "Create custom settings (for code developers)". This will allow us to select the recommended tests to verify the drivers against.

b.

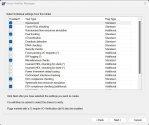
Please enable the settings shown above (Windows 11), that means enable the following:
- Special Pool
- Force IRQL Checking
- Pool Tracking
- Deadlock Detection
- Security Checks (only applicable to Windows 7 and later)
- Miscellaneous Checks
- Power framework delay fuzzing (only applicable to Windows 10 and below)
- DDI Compliance Checking (only applicable to Windows 8 and later)
- DDI Compliance Checking (Additional) (only applicable to Windows 8 and later)


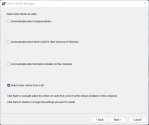
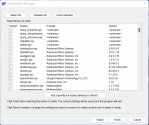
d. Check ALL boxes where "Microsoft" or "Unknown" IS NOT the Provider, with the exception of the following:
- Wdf01000.sys
- ndis.sys
- fltMgr.sys
- Storport.sys
I would also recommend not enabling verification on any drivers prefixed with dump_ or hiber_ since these drivers are responsible for managing dump and hibernation file creation, as mentioned in the following article: What are these ghost drivers named dump_diskdump.sys and other dump_*.sys that didn't come from any file? - The Old New Thing
Once you've selected the desired drivers then select Finish and then reboot the computer to start Driver Verifier.
Disabling Driver Verifier
If you're able to boot into Windows normally, then open an administrative command prompt and then enter the following command:
verifier /reset
You will need to reboot the machine for the changes to take effect. If you're unable to boot into Windows normally because of Driver Verifier is consistently causing the system to crash at boot, then please read the following tutorial: Disable Driver Verifier Outside Windows (Vista / 7 / 8 / 10)
This is usually because a boot driver is failing one or more of the Driver Verifier tests being run against it. This is a rare occurrence and it is unlikely that you will find yourself in this situation.
Check Driver Verifier Status
In order to check if Driver Verifier is running, then open a command prompt window and then enter the following command:
verifier /query
If Driver Verifier has been successfully started, then you should see the settings list of which options have been enabled. Otherwise, you’ll get a message indicating that no drivers are currently being verified. On the other hand, if you wish to see which settings have been selected, then please use the following command instead:
verifier /querysettings
Deprecated & Problematic Settings
Please note that the following settings are deprecated on Windows 11 and should not be enabled:
- Power Framework Delay Fuzzing
- Kernel Synchronisation Delay Fuzzing
Additionally, please do not, under any circumstances, enable "Randomised Low Resources Simulation" as it is known to cause false positives and is generally not needed at all.
Source: Low Resources Simulation - Windows driversDriver Verifier fails random instances of the driver's memory allocations, as might occur if the driver was running on a computer with insufficient memory. This tests the driver's ability to respond properly to low memory and other low-resource conditions.
Moreover, please do not enable "Systematic Low Resources Simulation" as it is known to cause false positives and can make the system generally unresponsive. It is even not recommended by Microsoft unless you're testing a very specific set of drivers.
Source: Systematic low resources simulation - Windows driversCaution This option is not intended for use when you are verifying all (or a large collection of) drivers on a computer. This option should be used only when you are doing targeted testing of individual drivers or their attached filter drivers. Using this option on a large number of drivers at the same time could cause unpredictable results, and could force crashes in components unrelated to the driver(s) you are testing.
Problems with I/O Verification:
1. The I/O verification option is designed to test for a particular set of bugs which we do not usually encounter when troubleshooting crashes. More importantly, this option should only be enabled on one driver at a time, in order to maximise it's effectiveness. This is officially stated in the Microsoft documentation here:
Source: I/O Verification - Windows driversWhen Level 1 I/O Verification is enabled, all IRPs obtained through IoAllocateIrp are allocated from a special pool and their use is tracked.
[...]
Because the special IRP pool is of limited size, I/O Verification is most effective when it is only used on one driver at a time.
2. The other two options rely on I/O Verification being enabled, however, IRP Logging simply creates an additional log which is only really useful for Stop 0x44 bugchecks. The other option which is "Force Pending I/O Requests" shouldn't even be enabled unless you have the source code associated to the driver you're testing:
Source: Force Pending I/O Requests - Windows driversCaution Do not use this option on a driver unless you have detailed knowledge of the operation of the driver and have verified that the driver is designed to handle STATUS_PENDING return values from all of its calls to IoCallDriver. Running this option on a driver that is not designed to handle STATUS_PENDING from all calls can result in crashes, memory corruptions, and unusual system behavior that can be difficult to debug or correct.
More Information:
About Driver Verifier
Driver Verifier Options
Using Driver Verifier
Info for Windows Server (applicable to Windows Server 2016+):
Things to consider before you enable Driver Verifier Manager on production servers
What is Special Pool?
Regards. . .
jcgriff2

