[SOLVED] Windows Update has stopped working and DISM and SFC do not complete (onecore\base\lstring\lblob.cpp(2138): Error STATUS_ILLEGAL_CHARACTER)?

blytha

Member
Joined
Apr 12, 2013
Posts
9
Hi All,

My first post here, so thanks for looking.
I have a problem with my mothers Win 10 Pro desktop.
Suddenly, I think after an update, the windows update stopped working and her HP printer driver could not be loaded. HP Smart cab still communicate with the printer and reports all is fine.
Steps so far:
  1. Windows update trouble-shooter could not fix the issue
  2. DISM and SFC /SCANNOW - both fail to complete - Procmon used to capture what was going on at the time.
    Code:
    C:\WINDOWS\system32>dism /online /cleanup-image /restorehealth
    Deployment Image Servicing and Management tool
    Version: 10.0.19041.3636
    
    Image Version: 10.0.19045.4780
    
    [==                         3.8%                           ]
    Error: 582
    
    An illegal character was encountered. For a multi-byte character set this includes a lead byte without a succeeding trail byte. For the Unicode character set this includes the characters 0xFFFF and 0xFFFE.
    
    The DISM log file can be found at C:\WINDOWS\Logs\DISM\dism.log
    
    C:\WINDOWS\system32>sfc /^S
    
    C:\WINDOWS\system32>sfc /SCANNOW
    
    Beginning system scan.  This process will take some time.
    
    
    Windows Resource Protection could not perform the requested operation.
    
    C:\WINDOWS\system32>
  3. Both tried again in safe mode - both failed
  4. Windows setup loaded to a USB and system repair tried - did not complete
  5. Windows media creation tool run to get an in place install of windows - did not complete.
I've eventually realised the issue is similar to this in regards to the underlying problem (Cumulative Update for Windows 10 Version 1607 for x64-based Systems (KB4015217) - Error 0x80070246)

So I thought I would upload the CBS.Log and Procmon Logfile.pml to see if any one can help me solve the problem, or alternatively point ,or point me in right direction. Unfortunately I live 2 hours away from her and can only connect using anydesk, until my next visit.
 

Attachments

Hi and welcome to Sysnative,

Upload your COMPONENTS hive.
  • Navigate to C:\Windows\System32\Config and locate the COMPONENTS file.
  • Please copy this file to your desktop.
  • Note: If you receive an error that this file is in-use, simply reboot your computer and try again.
  • Right-click on this file on your desktop and select Send To > Compressed (zipped) folder. This will create a file named COMPONENTS.ZIP on your desktop.
  • If the file is too large to upload here, upload the file to www.wetransfer.com and post the link in your next reply.
 
Hi,

Step 1. Replace Components Hive Manually

Warning: this fix is specific to the user in this thread. No one else should follow these instructions as it may cause more harm than good. If you are after assistance, please start a thread of your own.

  1. Download COMPONENTS.ZIP and save to your desktop.
  2. Right-click on it and select Extract all.... Make sure the "Show extracted files when complete" is checked and click Extract.
  3. Now we have the COMPONENTS file that we will be using to replace your current one.
  4. Navigate to C:\Windows\System32\config
  5. Right-click on the current COMPONENTS file and select rename. Rename it to COMPONENTS.bad.
    Note: If you get an error that the file is in use, reboot your computer and then try again.
  6. Take the file from the Components folder on your desktop and paste it into C:\Windows\System32\config


Step 2. Reboot the system and run
61f7aba7309a1-ComponentsScanner_Icon.png
ComponentsScanner again.
  • Right-click ComponentsScanner.exe and select "Run as administrator", click Yes on the UAC (User Account Control) prompt which appears.
  • Follow the on-screen instructions.
  • Once complete, a report will be saved to your desktop called ComponentsScanner.txt.
  • Post the logfile ComponentsScanner.txt as attachment into your next reply.
 

Attachments

Great, please attempt to update. If it fails attach a new copy of the CBS logs.
 
Hi,

Nope it still fails, it looks as though it will work but just loops around on restart with 0x800703f and 0x8007012 errors in the updates page.
 

Attachments

  • CBS.zip
    CBS.zip
    6.6 MB · Views: 1
  • Capture.webp
    Capture.webp
    33.9 KB · Views: 1
Rich (BB code):
2024-10-26 16:09:58, Error                 CBS    Doqe: Failed staging driver updates [HRESULT = 0x800703f1 - ERROR_BADDB]

Upload your DRIVERS Hive
  • Navigate to C:\Windows\System32\config and locate the DRIVERS file.
  • Please copy this file to your desktop.
  • Note: If you receive an error that this file is in-use, simply reboot your computer and try again.
  • Right-click on this file on your desktop and select Send To > Compressed (zipped) folder. This will create a file named DRIVERS.ZIP on your desktop.
  • If the file is too large to upload here, upload the file to www.wetransfer.com and post the link in your next reply.
 
Hi,

Replace Drivers Hive Manually

Warning: this fix is specific to the user in this thread. No one else should follow these instructions as it may cause more harm than good. If you are after assistance, please start a thread of your own.
  1. Download DRIVERS.ZIP and save to your desktop.
  2. Right-click on it and select Extract all.... Make sure the "Show extracted files when complete" is checked and click Extract.
  3. Now we have the DRIVERS file that we will be using to replace your current one.
  4. Navigate to C:\Windows\System32\config
  5. Right-click on the current DRIVERS file and select rename. Rename it to DRIVERS.bad.
    Note: If you get an error that the file is in use, reboot your computer and then try again.
  6. Take the file from the Drivers folder on your desktop and paste it into C:\Windows\System32\config

Afterwards reboot the system and attempt to update. If it fails attach the latest CBS logs and the following logfile.

Upload the setupapi.dev.log file
  • Open Windows Explorer and browse to the C:\Windows\INF folder.
  • Right-click on the file setupapi.dev.log and choose Send to > Compressed (zipped) folder.
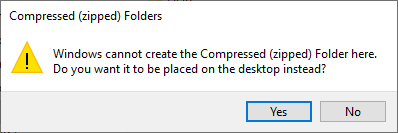
  • Now the message will appear, "Windows cannot create the Compressed (zipped) Folder here. Do you want it to be placed on the desktop instead?"
  • Click on the Yes button here.
657716925b62b-setup-api-dev-folder.png

  • Attach the file setupapi.dev.zip in your next reply.
 

Attachments

Here's the next fix.

Warning: This fix was written specifically for this system. Do not run this fix on another system.
  • Save any work you have open, and close all programs.
  • Download the attachment SFCFix.zip and save it to your desktop.
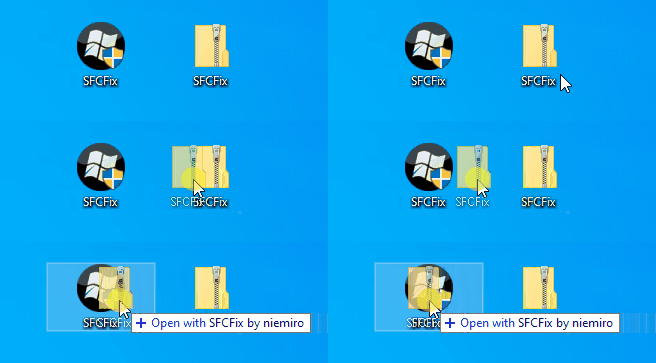
  • Drag the SFCFix.zip file over the SFCFix.exe executable and release it.
650c22f99662d-6190d993a26f3-SFCFix-Zip-Eng.gif

  • SFCFix will launch, let it complete.
  • Once done, a file will appear on your desktop, called SFCFix.txt.
  • Post the logfile (SFCFix.txt) as attachment in your next reply.

Afterwards attempt to update again. If it fails attach a new copy of the CBS logs and the Setupapi.dev.log.
 

Attachments

Hi,

You're welcome. Glad to hear everything is working as well now! (y)
I will mark this thread as solved.
 

Has Sysnative Forums helped you? Please consider donating to help us support the site!

Back
Top