0x80073701 - Windows Server Standard 2022

Micosofit

New member
Joined
Jan 16, 2025
Posts
4
For a few months now I have been facing the error "0x80073701" on Windows Server Standard 2022

This topic is my last hope, I want to avoid having to update Windows using an ISO file as much as possible or having to format it from scratch.


Thank you in advance.
 

Attachments

Hi @Micosofit,

Welcome to Sysnative Forums!

If you haven't already, please review the posting instructions here, and attach the requested log files. Without log files, our helpers will not be able to assist, and this will slow down fixing your machine.

If logs have been already been provided, our team of volunteers will analyse the provided log files to build a fix for your system. Please be aware that this may take several days from your initial post, due to the high volume of threads that we receive.


- Sysnative Windows Update Team
 
Hi and welcome to Sysnative,

Step 1. Open an elevated command prompt, run the following command and attach packages.txt to your next post.
Code:
DISM /online /get-packages /format:table > "%USERPROFILE%\desktop\Packages.txt"


Step 2.Upload your COMPONENTS hive.
  • Navigate to C:\Windows\System32\Config and locate the COMPONENTS file.
  • Please copy this file to your desktop.
  • Note: If you receive an error that this file is in-use, simply reboot your computer and try again.
  • Right-click on this file on your desktop and select Send To > Compressed (zipped) folder. This will create a file named COMPONENTS.ZIP on your desktop.
  • If the file is too large to upload here, upload the file to www.wetransfer.com and post the link in your next reply.


Step 3.Export CBS (Component Based Servicing) hive
  • Click on the Start button and type regedit
  • When you see regedit on the list, right-click on it and select Run as administrator.
  • When regedit opens, using the left pane, navigate to the following registry key and select it by clicking on it once.
    Code:
    HKEY_LOCAL_MACHINE\SOFTWARE\Microsoft\Windows\CurrentVersion\Component Based Servicing
  • Once selected, click File > Export....
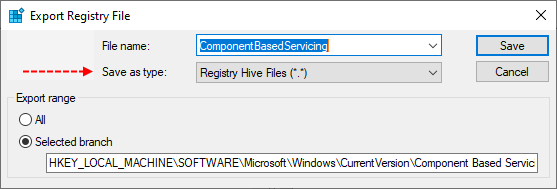
  • Change the Save as type: to Registry Hive Files (*.*).

    622dbef75cd3a-Export-CBS-hive.png

  • Name this file ComponentBasedServicing (with no file extension) and save it to your Desktop.
  • Right-click on the saved file and choose Send > Compressed (zipped) Folder.
  • Attach the .ZIP file to your next post.
  • If the file is too large to upload here, upload the file to www.wetransfer.com and post the link in your next reply.
 
Hi,

Download
67139f7e69a58-SFCFix-ico.PNG
SFCFix and save it to your desktop.

Warning: This fix was written specifically for this system. Do not run this fix on another system.
  • Save any work you have open, and close all programs.
  • Download the attachment SFCFix.zip and save it to your desktop.
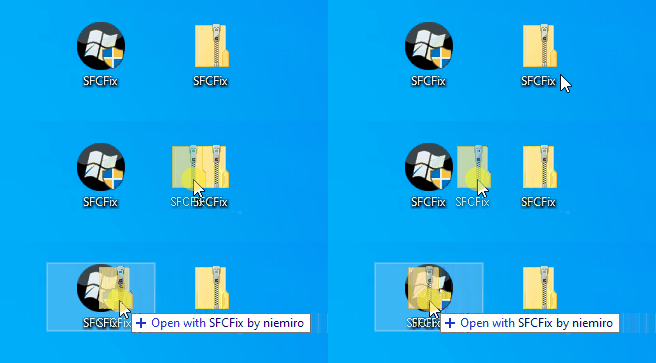
  • Drag the SFCFix.zip file over the SFCFix.exe executable and release it.
67139f52b3c1e-SFCFix-Zip-Eng.gif

  • SFCFix will launch, let it complete.
  • Once done, a file will appear on your desktop, called SFCFix.txt.
  • Post the logfile (SFCFix.txt) as attachment in your next reply.

Afterwards attempt to update. If it fails attach a new copy of the CBS logs.
 

Attachments

Hi,

Sorry for the delay in getting back to you, but unfortunately it didn't work.

This was the log generated (attached is CBS.log and SFCFix result)
 

Attachments

Another peculiar detail that I noticed is that Windows Update always fails the current month's update in the history, but for some reason when it launches the next update it is completed "successfully".

Although this is displayed in the Windows Update history, I doubt that it was able to actually apply the update as it did not even require a server reboot.
 

Attachments

  • printupdates.webp
    printupdates.webp
    56.5 KB · Views: 4
Hi,

That's weird, however it may have to do with the missing RTM components.

Step 1.
Warning: This fix was written specifically for this system. Do not run this fix on another system.
  • Save any work you have open, and close all programs.
  • Download the attachment SFCFix.zip and save it to your desktop.
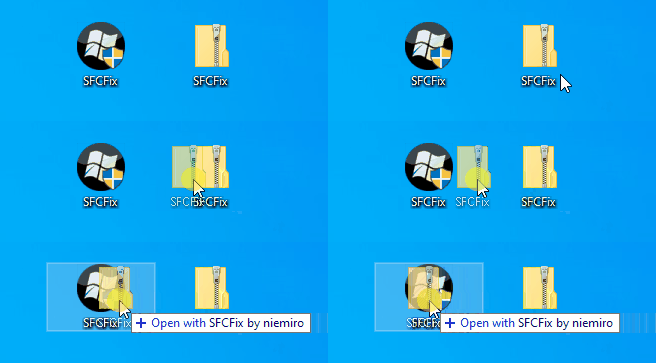
  • Drag the SFCFix.zip file over the SFCFix.exe executable and release it.
650c22f99662d-6190d993a26f3-SFCFix-Zip-Eng.gif

  • SFCFix will launch, let it complete.
  • Once done, a file will appear on your desktop, called SFCFix.txt.
  • Post the logfile (SFCFix.txt) as attachment in your next reply.


Step 2. Run the following DISM command and post the result. If it fails attach a new copy of the CBS log.
Code:
DISM /online /cleanup-image /RestoreHealth
 

Attachments

Has Sysnative Forums helped you? Please consider donating to help us support the site!

Back
Top