[SOLVED] Windows 10 Pro (1909) - Windows Update, SFC, DISM not working

LunchGuru

Member
Joined
Jul 3, 2023
Posts
9
Currently running Windows 10 Pro, 64 bit, version 1909, build 18363.959

Windows Update hasn't worked for a long time. It will check for updates, find a couple, download them, begin to install, go to "getting things ready", then ultimately fail with "There were problems installing some updates, but we'll try again later." "Some update files are missing or have problems. We'll try to download the update again later. Error code: (0x80070570)".

SFC won't run at all, gives "Windows Resource Protection could not start the repair service."

DISM won't run at all, gives "Error: 1392 The file or directory is corrupted and unreadable."

ComponentsScanner claims everything is fine.

SFCFix doesn't find any problems.

Trying to run DISM with a mounted ISO as the source doesn't work either. Have tried clearing out the Windows Update cache and that doesn't seem to help at all. Have also looked at / monitored Services and "Windows Update" appears to be starting up and running normally.
 

Attachments

Hi and welcome to Sysnative,

Please perform the following to get some more information about the Servicing Stack.

Download the
577bf0efb8088-FRST.png
Farbar Recovery Scan Tool and save it to your Desktop:

Download the 64 bit version: - Farbar Recovery Scan Tool Link
  • Download the attachment fixlist.txt and save it to your desktop.
  • Right-click on FRST.exe and select "Run as administrator".
  • Press the Fix button.
  • If for some reason the tool needs a restart, please make sure you let the system restart normally.
  • When finished, a log called Fixlog.txt will appear in the same directory the tool is run from.
  • Post the logfile Fixlog.txt as attachment in your next reply.
 

Attachments

Thank you for taking a look at my issue! I hadn't seen Farbar Recovery Scan Tool mentioned in any of my research so far, so hopefully it helps. Here's a result of the scan:
 

Attachments

Hi,

I'll need to setup a VM with Windows 10 1909, but can you provide the COMPONENTS hive in the meantime.

Upload your COMPONENTS hive.
  • Navigate to C:\Windows\System32\Config and locate the COMPONENTS file.
  • Please copy this file to your desktop.
  • Note: If you receive an error that this file is in-use, simply reboot your computer and try again.
  • Right-click on this file on your desktop and select Send To > Compressed (zipped) folder. This will create a file named COMPONENTS.ZIP on your desktop.
  • If the file is too large to upload here, upload the file to www.wetransfer.com and post the link in your next reply.
 
It seems a previous Servicing Stack Update is not installed correctly, please try try to reinstall this update with DISM.

Follow these instructions to install an update with DISM.
  • Open the Start menu of Windows and type CMD.
  • When you see Command Prompt on the list, select the option Run as administrator.
  • Copy and paste the following command into it, and press enter. (Leave the CMD window open!)
Code:
MD C:\WUTemp
  • Now, download the following update (KB4569073) to: C:\WUTemp - Or copy this file from the download directory to C:\WUTemp. (Important!)
    Downloadlink: KB54569073
  • Copy and paste the following commands one at a time into the command prompt and press enter after each.
Code:
CD C:\WUTemp
EXPAND.exe windows10.0-kb4569073-x64_d7cc9a3c6168cb9bf277f1a312c95abc962bf409.msu -f:* C:\WUTemp
DISM.exe /Online /Add-Package /PackagePath:C:\WUtemp\Windows10.0-KB4569073-x64.cab
  • Let me know if it says it was successful or if there are any errors. Or take a screenshot of the command prompt window and paste it into your next reply.
 
The final line was unsuccessful, got the 1392 error again:

Microsoft (R) File Expansion Utility
Copyright (c) Microsoft Corporation. All rights reserved.

Adding C:\WUTemp\WSUSSCAN.cab to Extraction Queue
Adding C:\WUTemp\Windows10.0-KB4569073-x64.cab to Extraction Queue
Adding C:\WUTemp\Windows10.0-KB4569073-x64-pkgProperties.txt to Extraction Queue
Adding C:\WUTemp\Windows10.0-KB4569073-x64.xml to Extraction Queue

Expanding Files ....

Expanding Files Complete ...
4 files total.

C:\WUTemp>DISM.exe /Online /Add-Package /PackagePath:C:\WUtemp\Windows10.0-KB4569073-x64.cab

Deployment Image Servicing and Management tool
Version: 10.0.18362.900

Image Version: 10.0.18363.959

An error occurred trying to open - C:\WUtemp\Windows10.0-KB4569073-x64.cab Error: 0x80070570
The file or directory is corrupted and unreadable.

Error: 1392

The file or directory is corrupted and unreadable.

The DISM log file can be found at C:\WINDOWS\Logs\DISM\dism.log

C:\WUTemp>
 
Looking at the DISM & CBS logs, it looks like it's the same "Failed to create CBS worker" problem still:

Code:
2023-07-06 11:38:39, Info                  DISM   DISM Package Manager: PID=16224 TID=12992 Encountered the option "packagepath" with value "C:\WUtemp\Windows10.0-KB4569073-x64.cab" - CPackageManagerCLIHandler::Private_GetPackagesFromCommandLine
2023-07-06 11:38:49, Error                 DISM   DISM Package Manager: PID=16224 TID=12992 Failed opening package. - CDISMPackageManager::Internal_CreatePackageByPath(hr:0x80070570)
2023-07-06 11:38:49, Error                 DISM   DISM Package Manager: PID=16224 TID=12992 Failed to get the underlying CBS package. - CDISMPackageManager::OpenPackageByPath(hr:0x80070570)
2023-07-06 11:38:49, Error                 DISM   DISM Package Manager: PID=16224 TID=12992 Failed to open the package at location: "C:\WUtemp\Windows10.0-KB4569073-x64.cab" - CPackageManagerCLIHandler::ProcessPackagePath(hr:0x80070570)
2023-07-06 11:38:49, Error                 DISM   DISM Package Manager: PID=16224 TID=12992 Failed while processing command add-package. - CPackageManagerCLIHandler::ExecuteCmdLine(hr:0x80070570)

Code:
2023-07-06 11:38:39, Info                  CBS    TI: --- Initializing Trusted Installer ---
2023-07-06 11:38:39, Info                  CBS    TI: Last boot time: 2023-07-06 10:23:55.500
2023-07-06 11:38:39, Info                  CBS    Starting TrustedInstaller initialization.
2023-07-06 11:38:39, Info                  CBS    Lock: New lock added: CCbsPublicSessionClassFactory, level: 30, total lock:4
2023-07-06 11:38:39, Info                  CBS    Lock: New lock added: CCbsPublicSessionClassFactory, level: 30, total lock:5
2023-07-06 11:38:39, Info                  CBS    Lock: New lock added: WinlogonNotifyLock, level: 8, total lock:6
2023-07-06 11:38:39, Info                  CBS    Ending TrustedInstaller initialization.
2023-07-06 11:38:39, Info                  CBS    Starting the TrustedInstaller main loop.
2023-07-06 11:38:39, Info                  CBS    TrustedInstaller service starts successfully.
2023-07-06 11:38:39, Info                  CBS    No startup processing required, TrustedInstaller service was not set as autostart
2023-07-06 11:38:39, Info                  CBS    Startup processing thread terminated normally
2023-07-06 11:38:39, Info                  CBS    TI: Startup Processing completes, release startup processing lock.
2023-07-06 11:38:39, Info                  CBS    Failed to create CBS worker - waiting for a second and trying again [HRESULT = 0x80070570]
2023-07-06 11:38:40, Info                  CBS    Failed to create CBS worker - waiting for a second and trying again [HRESULT = 0x80070570]
2023-07-06 11:38:41, Info                  CBS    Failed to create CBS worker - waiting for a second and trying again [HRESULT = 0x80070570]
2023-07-06 11:38:42, Info                  CBS    Failed to create CBS worker - waiting for a second and trying again [HRESULT = 0x80070570]
2023-07-06 11:38:43, Info                  CBS    Failed to create CBS worker - waiting for a second and trying again [HRESULT = 0x80070570]
2023-07-06 11:38:44, Info                  CBS    Failed to create CBS worker - waiting for a second and trying again [HRESULT = 0x80070570]
2023-07-06 11:38:45, Info                  CBS    Failed to create CBS worker - waiting for a second and trying again [HRESULT = 0x80070570]
2023-07-06 11:38:46, Info                  CBS    Failed to create CBS worker - waiting for a second and trying again [HRESULT = 0x80070570]
2023-07-06 11:38:47, Info                  CBS    Failed to create CBS worker - waiting for a second and trying again [HRESULT = 0x80070570]
2023-07-06 11:38:48, Info                  CBS    Failed to create CBS worker - waiting for a second and trying again [HRESULT = 0x80070570]
2023-07-06 11:38:49, Info                  CBS    Failed to create CBS worker, crashed? [HRESULT = 0x80070570]
2023-07-06 11:38:49, Info                  CBS    Failed to get worker process. [HRESULT = 0x80070570]
2023-07-06 11:38:49, Info                  CBS    Failed to create worker session. [HRESULT = 0x80070570]
2023-07-06 11:38:49, Info                  CBS    Failed to get worker session. [HRESULT = 0x80070570]
2023-07-06 11:38:49, Info                  CBS    Failed to create internal CBS package [HRESULT = 0x80070570]
 
Open an elevated command prompt and run the following command. Attach Dirlist.txt to your next post.
Code:
dir /s /a %systemroot%\WinSxS\amd64_microsoft-windows-servicingstack_31bf3856ad364e35_10.0.18362.1012_none_171983fb2a153d25 > "%userprofile%\Desktop\Dirlist.txt"
 
Hi,

Step 1. Download
56f31e53c97da-SFCFix.PNG
SFCFix and save it to your desktop.

Warning: This fix was written specifically for this system. Do not run this fix on another system.
  • Save any work you have open, and close all programs.
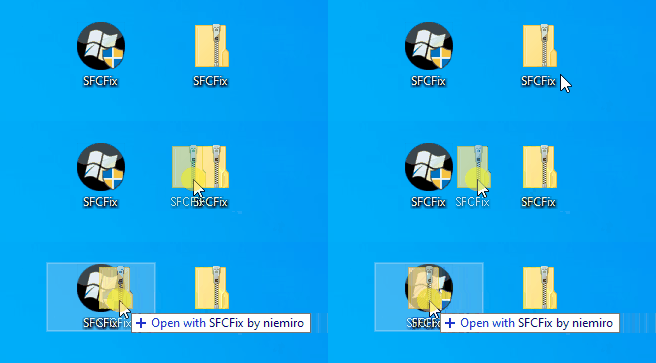
  • Download the attachment SFCFix.zip and save it to your desktop.
  • Drag the SFCFix.zip file over the SFCFix.exe executable and release it.
6190d993a26f3-SFCFix-Zip-Eng.gif

  • SFCFix will launch, let it complete.
  • Once done, a file will appear on your desktop, called SFCFix.txt.
  • Post the logfile (SFCFix.txt) as attachment in your next reply.


Step 2. Run the following DISM command and post the result. If it fails attach a new copy of the CBS log.
Code:
DISM /online /cleanup-image /RestoreHealth
 

Attachments

Ooh, progress! SFCFix ran successfully and DISM at least actually started running and doing something this time. It got about 66% complete then failed with:

Code:
C:\WINDOWS\system32>DISM /online /cleanup-image /RestoreHealth

Deployment Image Servicing and Management tool
Version: 10.0.18362.900

Image Version: 10.0.18363.959

[==========================100.0%==========================]
Error: 0x800f081f

The source files could not be found.
Use the "Source" option to specify the location of the files that are required to restore the feature. For more information on specifying a source location, see http://go.microsoft.com/fwlink/?LinkId=243077.

The DISM log file can be found at C:\WINDOWS\Logs\DISM\dism.log
 

Attachments

Hi,

Here's the next fix.

Step 1.
Warning: This fix was written specifically for this system. Do not run this fix on another system.
  • Save any work you have open, and close all programs.
  • Download the attachment SFCFix.zip and save it to your desktop.
  • Drag the SFCFix.zip file over the SFCFix.exe executable and release it.
6190d993a26f3-SFCFix-Zip-Eng.gif

  • SFCFix will launch, let it complete.
  • Once done, a file will appear on your desktop, called SFCFix.txt.
  • Post the logfile (SFCFix.txt) as attachment in your next reply.


Step 2. Run the following DISM command and post the result. If it fails attach a new copy of the CBS log.
Code:
DISM /online /cleanup-image /RestoreHealth
 

Attachments

Ok, major progress with that last batch of steps! Things are actually starting to work now!!! Windows Update started working, installed a few updates, and managed to get build 20H2 installed. Although now it appears to be stuck. It will check for updates and say "Your device is missing important security and quality fixes." but then doesn't list anything to download or install. Both DISM and SFC run and complete without finding any errors.
 
Hi,

Please try to install the latest build 22H2 using the following tool.

Download the
61c988c2082b1-updateassistent.png
Windows 10 Update Assistant to your desktop.
  • Right-click on Windows10Upgrade9252.exe and select the option: Run as administrator.
  • Press the Update now button, click after the compatibility check on Next.
  • The Update Assistant will now download the latest Feature Update.
  • After verifying the download, the Feature Update will be installed.
  • When this process is ready, click on the Restart now button to complete the installation.
 
Wow, everything is now completely up to date. I haven't seen that message in a long time. Thank you so much for all of your help. This was certainly quite complicated and required some precision fixes!
 
Hi,

You're welcome. Glad the problem has been resolved and the system is fully up-to-date now.. (y)
I'll mark this thread as solved.
 

Has Sysnative Forums helped you? Please consider donating to help us support the site!

Back
Top