[SOLVED] Windows Server 20222 cannot add/remove components

crzyct

Member
Jul 26, 2024
19
Chiang Mai, Thailand
We have a Windows Server 2022 machine which is one node of a two-node S2D and Hyper-V cluster.
It works fine in general, but when we're trying to add or remove any Windows features, it reports the following error:

PS C:\Windows\system32> Enable-WindowsOptionalFeature -Online -FeatureName SMBDirect
Enable-WindowsOptionalFeature : Class not registered

We tried the usual sfc and DISM troubleshooting, but these don't run.

PS C:\Windows\system32> sfc /scannow
Windows Resource Protection could not start the repair service.

PS C:\Windows\system32> Dism /Online /Cleanup-Image /ScanHealth
Deployment Image Servicing and Management tool
Version: 10.0.20348.681
Image Version: 10.0.20348.2402
Error: 0x80040154
Class not registered

ComponentsScanner.exe found no issues. Logfile is attached.

As an important information, the server crashed about a year ago while rebooting during updating, and we opened a case with Microsoft support to get it repaired. They restored a backup of the registry which made the server boot up again. But after this action, the above behavior started. They can't help further unfortunately, suggesting an in-place reinstall/upgrade. As I read from the forum, it may be a servicing stack issue, but to avoid risk, we would appreciate your advice on how to proceed to hopefully fix this issue.

This server is very important for us, and we would really like to avoid having to reinstall it.
 

Attachments

Hi @crzyct,

Welcome to Sysnative Forums!

If you haven't already, please review the posting instructions here, and attach the requested log files. Without log files, our helpers will not be able to assist, and this will slow down fixing your machine.

If logs have been already been provided, our team of volunteers will analyse the provided log files to build a fix for your system. Please be aware that this may take several days from your initial post, due to the high volume of threads that we receive.


- Sysnative Windows Update Team
 
Hi and welcome to Sysnative,

Please do the following to get some more information about the Servicing Stack.

Download the
577bf0efb8088-FRST.png
Farbar Recovery Scan Tool and save it to your Desktop:

Download the 64 bit version: - Farbar Recovery Scan Tool Link

  • Download the attachment fixlist.txt and save it to your desktop.
  • Right-click on FRST.exe and select "Run as administrator".
  • Press the Fix button.
  • If for some reason the tool needs a restart, please make sure you let the system restart normally.
  • When finished, a log called Fixlog.txt will appear in the same directory the tool is run from.
  • Post the logfile Fixlog.txt as attachment in your next reply.
 

Attachments

Hi,

Step 1. Download
6530fbb0f4101-56f31e53c97da-SFCFix.PNG
SFCFix and save it to your desktop.

Warning: This fix was written specifically for this system. Do not run this fix on another system.
  • Save any work you have open, and close all programs.
  • Download the attachment SFCFixScript.txt and save it to your desktop.
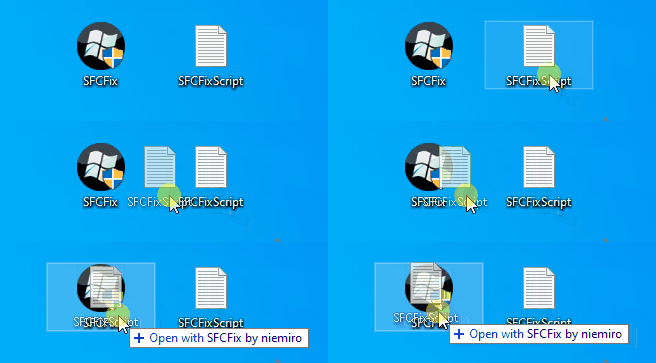
  • Drag the SFCFixScript.txt file over the SFCFix.exe executable and release it.
650ef5dbdfd06-62151e1bebac4-SFCFix-Txt-Eng.gif

  • SFCFix will launch, let it complete.
  • Once done, a file will appear on your desktop, called SFCFix.txt.
  • Post the logfile (SFCFix.txt) as attachment in your next reply.


Step 2. Run the following DISM command and post the result. If it fails attach a new copy of the CBS log.
Code:
DISM /online /cleanup-image /RestoreHealth
 

Attachments

Thank you for your quick reply, very appreciated!
Since this is a production server, we will need to do this tomorrow night during the next maintenance window. I will provide the result afterwards.
 
Hi,

Please run the following fix first.

Step 1.
Warning: This fix was written specifically for this system. Do not run this fix on another system.
  • Save any work you have open, and close all programs.
  • Download the attachment SFCFix.zip and save it to your desktop.
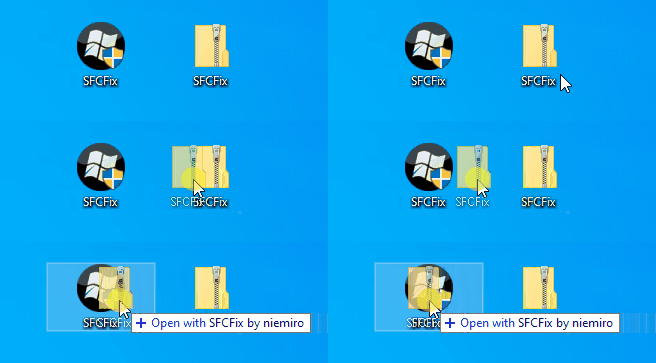
  • Drag the SFCFix.zip file over the SFCFix.exe executable and release it.
650c22f99662d-6190d993a26f3-SFCFix-Zip-Eng.gif

  • SFCFix will launch, let it complete.
  • Once done, a file will appear on your desktop, called SFCFix.txt.
  • Post the logfile (SFCFix.txt) as attachment in your next reply.


Step 2. Run the following DISM command and post the result. If it fails attach a new copy of the CBS log.
Code:
DISM /online /cleanup-image /RestoreHealth
 

Attachments

The DISM command completed successfully! One big step further, thank you so much!

Deployment Image Servicing and Management tool
Version: 10.0.20348.681

Image Version: 10.0.20348.2402

[==========================100.0%==========================] The restore operation completed successfully.
The operation completed successfully.

However, we're still unable to install Windows Features, now we get another error 0x8000ffff for any feature we want to install.

PS C:\Windows\system32> Enable-WindowsOptionalFeature -Online -FeatureName SMBDirect
Enable-WindowsOptionalFeature : Enable-WindowsOptionalFeature failed. Error code = 0x8000ffff

Any advice?
 
Please provide the latest CBS logs and a copy of the COMPONENTS hive.

Upload a copy of the CBS folder
  • Open Windows Explorer and browse to the C:\Windows\Logs folder.
  • Right-click on the CBS folder and choose Send to > Compressed (zipped) folder.
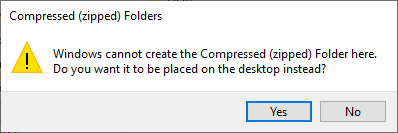
  • Now the message will appear, "Windows cannot create the Compressed (zipped) Folder here. Do you want it to be placed on the desktop instead?"
  • Click on the Yes button here.
653a64385d891-618e949e09fef-CBS-Folder.png

  • Attach the file CBS.zip to your next reply. If the file is too large to attach, upload the CBS.zip file to www.wetransfer.com and post the link in your next reply.

Upload your COMPONENTS hive.
  • Navigate to C:\Windows\System32\Config and locate the COMPONENTS file.
  • Please copy this file to your desktop.
  • Note: If you receive an error that this file is in-use, simply reboot your computer and try again.
  • Right-click on this file on your desktop and select Send To > Compressed (zipped) folder. This will create a file named COMPONENTS.ZIP on your desktop.
  • If the file is too large to upload here, upload the file to www.wetransfer.com and post the link in your next reply.
 
Hi,

Export CBS (Component Based Servicing) hive
  • Click on the Start button and type regedit
  • When you see regedit on the list, right-click on it and select Run as administrator.
  • When regedit opens, using the left pane, navigate to the following registry key and select it by clicking on it once.
    Code:
    HKEY_LOCAL_MACHINE\SOFTWARE\Microsoft\Windows\CurrentVersion\Component Based Servicing
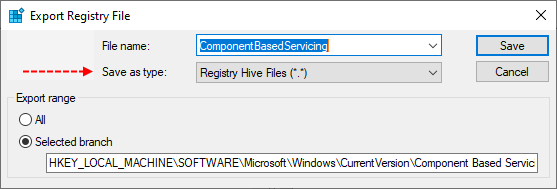
  • Once selected, click File > Export....
  • Change the Save as type: to Registry Hive Files (*.*).

    622dbef75cd3a-Export-CBS-hive.png

  • Name this file ComponentBasedServicing (with no file extension) and save it to your Desktop.
  • Right-click on the saved file and choose Send > Compressed (zipped) Folder.
  • Attach the .ZIP file to your next post.
  • If the file is too large to upload here, upload the file to www.wetransfer.com and post the link in your next reply.
 
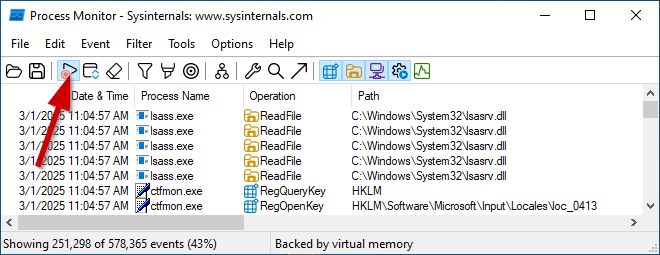
Please try to install the feature again with Process Monitor running.

Step#1 - Capture Process Monitor Trace
1. Download and run Process Monitor. Leave this running while you perform the next steps.
2. Please try to install the feature just like you have in the past.
3. Stop Process Monitor a minute after it fails, just to be sure everything is logged. You can simply do this by clicking the capture icon (CTRL +E) on the toolbar as shown below.

67c2dd018fcab-Process-Monitor.png


4. Select the File menu...Save... and save the file to your desktop. This is likely the default location. The name (unless changed) will be LogFile.PML. This is fine.
5. Zip up the LogFile.PML and upload it to WeTransfer | Send Large Files Fast and provide the link.
6. Upload also the latest CBS log for the time stamps.
 
Last edited:

Has Sysnative Forums helped you? Please consider donating to help us support the site!

Back
Top