Windows System Restore - Configure Restore Point Space (Windows 10,8.1, 8, 7 & Vista)


To configure the amount of space used by Windows System Restore restore points, follow these instructions:
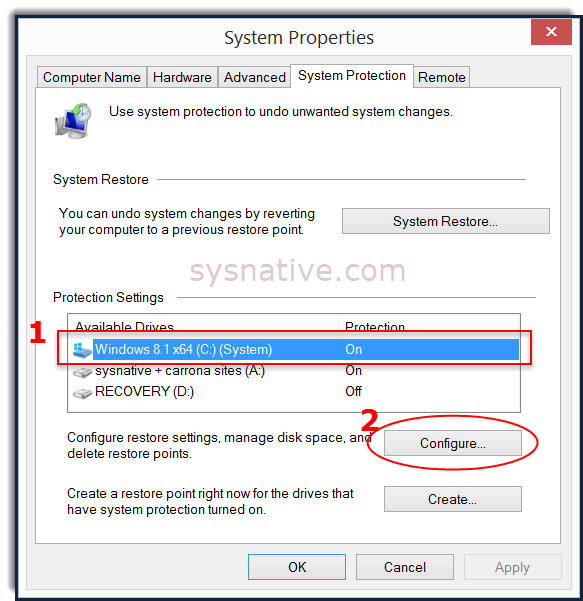
1. Select (left-click one time) the drive or partition you wish to configure Windows System Restore point space for
2. Click on Configure

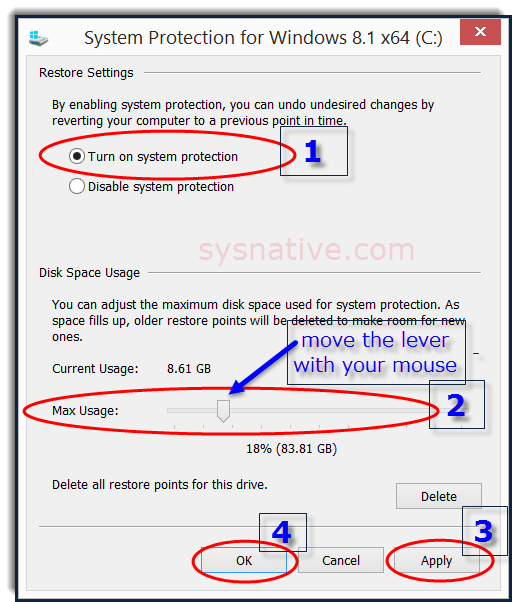
1. Make sure System Protection is turned ON
2. Move the lever with your mouse (left-click & hold mouse button down) - slide it to the left or right to decrease or increase the amount of space you wish to allocate to Windows System Restore for the selected drive
3. Click on Apply
4. Click on OK

You can now create a Windows System Restore point. Please see - Windows System Restore - Create a Restore Point (Windows 10, 8.1, 8, 7 & Vista)
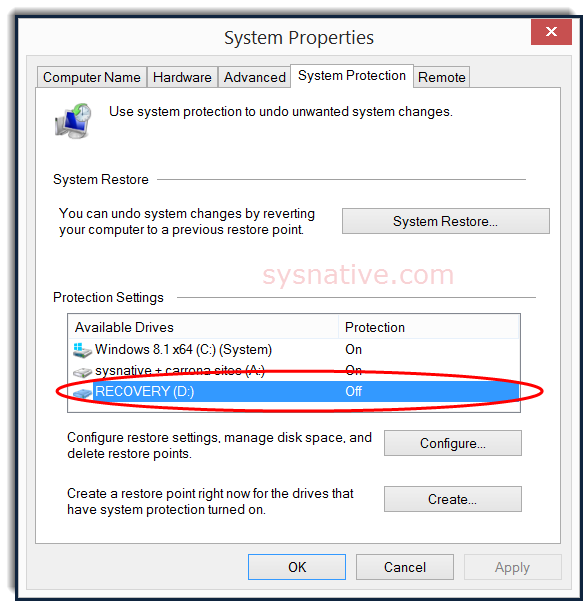
System Restore should be turned OFF for OEM (system manufacturer) Recovery Partitions as is noted in this screenshot:

To run Windows System Restore, please see - Windows System Restore - Restore your System (Windows 10, 8.1, 8, 7 & Vista)
`

Windows System Restore - Configure Restore Point Space

Please Note:
The first step may appear to be incorrect as it applies to creating a restore point; however, we are simply using the "create steps" to get us to the space configuration screen.
To configure the amount of space used by Windows System Restore restore points, follow these instructions:
- Windows 10 + Windows 7 + Windows Vista -
Click on START | type create | select "Create a Restore Point" at the top of the menu -
- Windows 8.1 + Windows 8 -
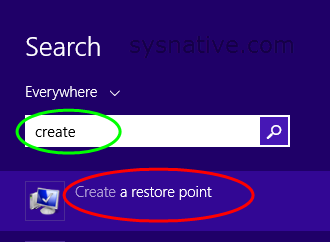
Bring up a Search box (WIN + S keys) and type create into it; select "Create a Restore Point"; press ENTER -
Click on START | type create | select "Create a Restore Point" at the top of the menu -
- Windows 8.1 + Windows 8 -
Bring up a Search box (WIN + S keys) and type create into it; select "Create a Restore Point"; press ENTER -
1. Select (left-click one time) the drive or partition you wish to configure Windows System Restore point space for
2. Click on Configure

1. Make sure System Protection is turned ON
2. Move the lever with your mouse (left-click & hold mouse button down) - slide it to the left or right to decrease or increase the amount of space you wish to allocate to Windows System Restore for the selected drive
3. Click on Apply
4. Click on OK

You can now create a Windows System Restore point. Please see - Windows System Restore - Create a Restore Point (Windows 10, 8.1, 8, 7 & Vista)
Very important for systems with OEM Recovery Partitions
System Restore should be turned OFF for OEM (system manufacturer) Recovery Partitions as is noted in this screenshot:

To run Windows System Restore, please see - Windows System Restore - Restore your System (Windows 10, 8.1, 8, 7 & Vista)
Last edited:


