[SOLVED] DISM doesn't work

Status
Not open for further replies.
DISM and SFC continue not to run.

Sign in Safe mode once more. I would like to remove the Avast remnant. There was a typo in the previous logs and that's why it's still there.

Run the following fix this time:

Code:
Start::
2024-07-19 21:53 - 2021-12-19 02:14 - 000000000 ____D C:\Windows\system32\Tasks\Avast Software
End::

After that, I'll ask you to do something "more drastic".
 
Good. Avast remnant is removed now.

Now, we are going to try an in-place upgrade, using the ISO file.
  • Go to this Microsoft page and under the title Create Windows 10 installation media press on Download tool now.
  • Save the tool on your Desktop and double click to run it.
  • On the License terms page, if you accept the license terms, select Accept.
  • On the What do you want to do page, select Create installation media (USB....) and then select Next.
  • Choose the ISO file option. Once the download is complete, right click the ISO and select the option Mount.
  • Open the Windows File Explorer and open mounted ISO, and run the setup.exe file.
  • Follow the instructions and click on the option Change what to keep.
  • Select the option Keep personal files and apps and click next.
  • Windows Setup will now start the in-place upgrade installation to repair Windows.
Let me know if it works for you.
 
The Windows Setup stopped at 62~%, when i received the error attached below. It roughly translates to "The Windows Installation did not work".
 

Attachments

  • image_2024-07-20_231643091.png
    image_2024-07-20_231643091.png
    202.6 KB · Views: 5
If it's of any usefulness, I tried what you told me before finding this website and it only got me to a 20~% so this was better than before.
 
Maxstar, who is the specialist in Windows Update, will be here with you soon.

Until then, also do this.

NOTICE: This script was written specifically for this user. Running it on another machine may cause damage to your operating system
  • Select the entire contents of the code box below, from the "Start::" line to "End::", including both lines. Right-click and select "Copy ". No need to paste anything to anywhere.
Code:
Start::
StartBatch:
dir /s /a %systemroot%\servicing\version
dir /s /a %systemroot%\WinSxS\amd64_microsoft-windows-servicingstack_31bf3856ad364e35*.*
EndBatch:
CMD: reg query "HKEY_CLASSES_ROOT\CLSID\{0823B6F8-F499-4d5e-B885-EA9CB4F43B24}" /s
CMD: reg query "HKEY_CLASSES_ROOT\CLSID\{75207391-23F2-4396-85F0-8FDB879ED0ED}" /s
CMD: reg query "HKEY_LOCAL_MACHINE\SOFTWARE\Classes\CLSID\{0823B6F8-F499-4d5e-B885-EA9CB4F43B24}" /s
CMD: reg query "HKEY_LOCAL_MACHINE\SOFTWARE\Classes\WOW6432Node\CLSID\{0823B6F8-F499-4d5e-B885-EA9CB4F43B24}" /s
CMD: reg query "HKEY_LOCAL_MACHINE\SOFTWARE\Microsoft\Windows\CurrentVersion\Component Based Servicing\Version" /s
CMD: reg query "HKEY_LOCAL_MACHINE\SOFTWARE\Microsoft\Windows\CurrentVersion\SideBySide\Winners\amd64_microsoft-windows-servicingstack_31bf3856ad364e35_none_4a207b402ad93a1c\10.0" /s
CMD: reg load HKLM\COMPONENTS C:\WINDOWS\SYSTEM32\CONFIG\COMPONENTS
CMD: reg query "HKEY_LOCAL_MACHINE\COMPONENTS\ServicingStackVersions" /s
End::
  • Right-click on FRST64 on your Desktop, to run it as administrator. When the tool opens, click "yes" to the disclaimer.
  • Press the Fix button once and wait.
  • FRST will process fixlist.txt
  • When finished, it will produce a log fixlog.txt on your Desktop.
  • Post the log in your next reply.
 
So, when I ran the Components Scanner, after getting through the UAC, I received lots of purple colored errors, which ended with a yellow colored error, saying something about major hive damage, with no log showing up on my desktop, but after running the fix you sent me, everything went fine and i received the log on my desktop. So here are the logs you needed.
 

Attachments

OK! Perfect!

Now, we will be waiting for Maxstar. As I said, he is the Windows Update specialist here, and he will find the way to resolve your update issue.
 
Alright then. Thank you for everything you helped me with until now!

You are very welcome. Just letting you know, that the computer is clean now.

I'll be around, following the topic. 🙂
 
Hi,

Step 1. Download
6530fbb0f4101-56f31e53c97da-SFCFix.PNG
SFCFix and save it to your desktop.

Warning: This fix was written specifically for this system. Do not run this fix on another system.
  • Save any work you have open, and close all programs.
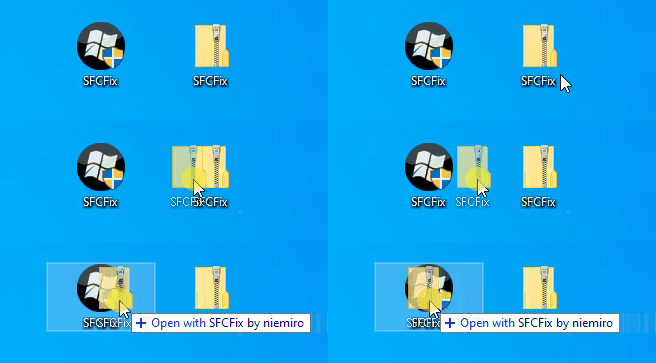
  • Download the attachment SFCFix.zip and save it to your desktop.
  • Drag the SFCFix.zip file over the SFCFix.exe executable and release it.
650c22f99662d-6190d993a26f3-SFCFix-Zip-Eng.gif

  • SFCFix will launch, let it complete.
  • Once done, a file will appear on your desktop, called SFCFix.txt.
  • Post the logfile (SFCFix.txt) as attachment in your next reply.


Step 2. Run the following DISM command and post the result. If it fails attach a new copy of the CBS log.
Code:
DISM /online /cleanup-image /RestoreHealth
 

Attachments

I'm not sure if the following image counts as a failed attempt of running the DISM command, but just in case I will attach both the photo of what the cmd showed me and the new CBS log. I'll attach everything below.
 

Attachments

This is a common issue in such cases, but the latest CBS logs are missing in your post. So please upload them again.
 
Thanks, here's the next fix.

Step 1.
Warning: This fix was written specifically for this system. Do not run this fix on another system.
  • Save any work you have open, and close all programs.
  • Download the attachment SFCFix.zip and save it to your desktop.
  • Drag the SFCFix.zip file over the SFCFix.exe executable and release it.
650c22f99662d-6190d993a26f3-SFCFix-Zip-Eng.gif

  • SFCFix will launch, let it complete.
  • Once done, a file will appear on your desktop, called SFCFix.txt.
  • Post the logfile (SFCFix.txt) as attachment in your next reply.


Step 2. Run the following DISM command and post the result. If it fails attach a new copy of the CBS log.
Code:
DISM /online /cleanup-image /RestoreHealth
 

Attachments

Here's the next fix.

Step 1.
Warning: This fix was written specifically for this system. Do not run this fix on another system.
  • Save any work you have open, and close all programs.
  • Download the attachment SFCFix.zip and save it to your desktop.
  • Drag the SFCFix.zip file over the SFCFix.exe executable and release it.
650c22f99662d-6190d993a26f3-SFCFix-Zip-Eng.gif

  • SFCFix will launch, let it complete.
  • Once done, a file will appear on your desktop, called SFCFix.txt.
  • Post the logfile (SFCFix.txt) as attachment in your next reply.


Step 2. Run the following DISM command and post the result. If it fails attach a new copy of the CBS log.
Code:
DISM /online /cleanup-image /RestoreHealth
 

Attachments

This is normal since we'll need to restore a number of Servicing Stack Components.

Here's the next fix.

Step 1.
Warning: This fix was written specifically for this system. Do not run this fix on another system.
  • Save any work you have open, and close all programs.
  • Download the attachment SFCFix.zip and save it to your desktop.
  • Drag the SFCFix.zip file over the SFCFix.exe executable and release it.
650c22f99662d-6190d993a26f3-SFCFix-Zip-Eng.gif

  • SFCFix will launch, let it complete.
  • Once done, a file will appear on your desktop, called SFCFix.txt.
  • Post the logfile (SFCFix.txt) as attachment in your next reply.


Step 2. Run the following DISM command and post the result. If it fails attach a new copy of the CBS log.
Code:
DISM /online /cleanup-image /RestoreHealth
 

Attachments

Status
Not open for further replies.

Has Sysnative Forums helped you? Please consider donating to help us support the site!

Back
Top