andrewlen
Well-known member
Introduction
I often see folks resorting to taking pictures of their monitors to upload snapshots containing clarifying information asked of them.
While doing that can sometimes be helpful (if Windows isn't running for example), there's a much easier way to do it providing Microsoft Windows is operational.
This quick tutorial shows you five simple steps to capture anything displayed on your monitor within Windows 10.
I’ll be using Windows Device Manager's window for the purpose of this demonstration, but the instructions apply equally to anything else visible on your desktop.
Step 1:
To start the Snipping Tool, you can use either of the following two methods.
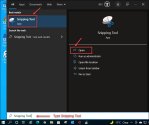
Press your Windows Key and type Snipping Tool – Press Enter or click Open
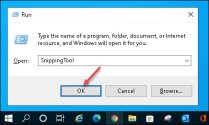
Press your Windows Key + R then type SnippingTool and press Enter or click OK
Alternate Method: Keyboard Shortcut – Press your Windows Key + Shift + S keys for an alternate presentation of the same tool.
 For more info on this method, see the following Microsoft Document.
Step 2:
Taking your first Snapshot
Click the New snip icon (or press Alt + N)
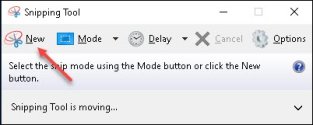
Your desktop will fade, and the pointer will change to a cross indicating the tool is ready to capture.
Step 3:
Move your pointer to the top left corner of what you want to capture, click and hold the left mouse button and drag to place a box around the area you want to take a snapshot of.
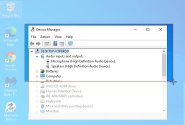
Step 4:
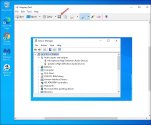
Once you're happy, release the left mouse button, and your selection will appear in the Snipping Tool. Click the Save Snip icon to save a copy of your capture.
Step 5:
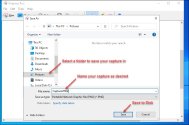
a) Select a folder to save your capture in
b) Name your capture as desired (or just accept the Capture.PNG default)
c) Click the Save button to save your capture to disk
Done!
You now have a saved picture file you can upload and share without needing a camera to take a photo of your monitor's contents.
Rinse and repeat the above steps to take any other screenshot captures you may need.
Some additional information
After completing Step 1 above, you have some options you can set for yourself on the fly before moving to Step 2.
Mode
Delay
Editing your captures

Conclusion
The Windows Snipping Tool is available in all versions of Windows 10. That said, many other third-party tools have been developed that provide many more powerful features. The following article shows just some of the alternatives available.
30 Best Screen Capture (Screenshot) Software, Tool & Apps
Hope you found this helpful.
Best regards, Andrew Leniart
I often see folks resorting to taking pictures of their monitors to upload snapshots containing clarifying information asked of them.
While doing that can sometimes be helpful (if Windows isn't running for example), there's a much easier way to do it providing Microsoft Windows is operational.
This quick tutorial shows you five simple steps to capture anything displayed on your monitor within Windows 10.
I’ll be using Windows Device Manager's window for the purpose of this demonstration, but the instructions apply equally to anything else visible on your desktop.
Step 1:
To start the Snipping Tool, you can use either of the following two methods.
Press your Windows Key and type Snipping Tool – Press Enter or click Open

Press your Windows Key + R then type SnippingTool and press Enter or click OK

Alternate Method: Keyboard Shortcut – Press your Windows Key + Shift + S keys for an alternate presentation of the same tool.
 For more info on this method, see the following Microsoft Document.
Step 2:
Taking your first Snapshot
Click the New snip icon (or press Alt + N)

Your desktop will fade, and the pointer will change to a cross indicating the tool is ready to capture.
Step 3:
Move your pointer to the top left corner of what you want to capture, click and hold the left mouse button and drag to place a box around the area you want to take a snapshot of.

Step 4:
Once you're happy, release the left mouse button, and your selection will appear in the Snipping Tool. Click the Save Snip icon to save a copy of your capture.

Step 5:
a) Select a folder to save your capture in
b) Name your capture as desired (or just accept the Capture.PNG default)
c) Click the Save button to save your capture to disk

Done!
You now have a saved picture file you can upload and share without needing a camera to take a photo of your monitor's contents.
Rinse and repeat the above steps to take any other screenshot captures you may need.
Some additional information
After completing Step 1 above, you have some options you can set for yourself on the fly before moving to Step 2.
Mode
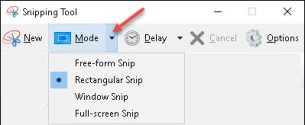
- Free-form Snip - (A free-form method of making a selection to capture)
- Rectangular Snip - (Drag a rectangle selection to capture) - this is the default
- Window Snip - (Select any open Window on your desktop to capture)
- Full-Screen Snip - (Capture the entire screen)

Delay
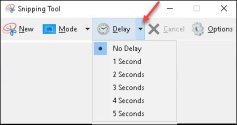
- Sets a 1 - 5 second delay before your screen fades after clicking the New Snip icon at Step 2.
- This is handy if you need to open a menu or similar that must be clicked on the desktop before the capture is taken.

Editing your captures
- At Step 4 above, you have the opportunity to edit your capture before saving and committing it to disk. Options are shown below.

Conclusion
The Windows Snipping Tool is available in all versions of Windows 10. That said, many other third-party tools have been developed that provide many more powerful features. The following article shows just some of the alternatives available.
30 Best Screen Capture (Screenshot) Software, Tool & Apps
Hope you found this helpful.
Best regards, Andrew Leniart


