Navigation
Install the app
How to install the app on iOS
Follow along with the video below to see how to install our site as a web app on your home screen.
Note: This feature may not be available in some browsers.
More options
You are using an out of date browser. It may not display this or other websites correctly.
You should upgrade or use an alternative browser.
You should upgrade or use an alternative browser.
[SOLVED] WS2016 DISM Error "The array bounds are invalid"
- Thread starter savas82
- Start date
Next fix.
Start the
 Farbar Recovery Scan Tool again.
Warning: This script was written specifically for this system. Do not run this script on another system.
Afterwards run FRST again for a REG search with the COMPONENTS hive loaded for the last 3 updates.
Start the
Warning: This script was written specifically for this system. Do not run this script on another system.
- Download the attachment fixlist.txt and save it to your desktop.
- Right-click on FRST.exe and select "Run as administrator".
- Press the Fix button.
- If for some reason the tool needs a restart, please make sure you let the system restart normally.
- When finished, a log called Fixlog.txt will appear in the same directory the tool is run from.
- Post the logfile Fixlog.txt as attachment in your next reply.
Afterwards run FRST again for a REG search with the COMPONENTS hive loaded for the last 3 updates.
Code:
KB5008207;KB5009546;KB4493470Attachments
Step 1. Start the
 Farbar Recovery Scan Tool again.
Warning: This script was written specifically for this system. Do not run this script on another system.
Step 2. Run the following DISM command and post the result. If it fails attach a new copy of the CBS log.
Warning: This script was written specifically for this system. Do not run this script on another system.
- Download the attachment fixlist.txt and save it to your desktop.
- Right-click on FRST.exe and select "Run as administrator".
- Press the Fix button.
- If for some reason the tool needs a restart, please make sure you let the system restart normally.
- When finished, a log called Fixlog.txt will appear in the same directory the tool is run from.
- Post the logfile Fixlog.txt as attachment in your next reply.
Step 2. Run the following DISM command and post the result. If it fails attach a new copy of the CBS log.
Code:
DISM /online /cleanup-image /RestoreHealthAttachments
Great, please let me know the result of DISM and post the new CBS logs to see if there are any remaining warnings.
Ok. Thanks a lot.Harika, lütfen DISM sonucunu bana bildirin ve kalan uyarılar olup olmadığını görmek için yeni CBS kayıtlarını yayınlayın.
Yes, we'll need to remove some other remnants!
Here's the next fix.
Step 1. Start the
 Farbar Recovery Scan Tool again.
Warning: This script was written specifically for this system. Do not run this script on another system.
Step 2. Run the following DISM command and attach a new copy of the CBS log.
Here's the next fix.
Step 1. Start the
Warning: This script was written specifically for this system. Do not run this script on another system.
- Download the attachment fixlist.txt and save it to your desktop.
- Right-click on FRST.exe and select "Run as administrator".
- Press the Fix button.
- If for some reason the tool needs a restart, please make sure you let the system restart normally.
- When finished, a log called Fixlog.txt will appear in the same directory the tool is run from.
- Post the logfile Fixlog.txt as attachment in your next reply.
Step 2. Run the following DISM command and attach a new copy of the CBS log.
Code:
DISM /online /cleanup-image /RestoreHealthAttachments
Here's the next fix.
Step 1. Start the
 Farbar Recovery Scan Tool again.
Warning: This script was written specifically for this system. Do not run this script on another system.
Step 2. Run the following DISM command and attach a new copy of the CBS log.
Step 1. Start the
Warning: This script was written specifically for this system. Do not run this script on another system.
- Download the attachment fixlist.txt and save it to your desktop.
- Right-click on FRST.exe and select "Run as administrator".
- Press the Fix button.
- If for some reason the tool needs a restart, please make sure you let the system restart normally.
- When finished, a log called Fixlog.txt will appear in the same directory the tool is run from.
- Post the logfile Fixlog.txt as attachment in your next reply.
Step 2. Run the following DISM command and attach a new copy of the CBS log.
Code:
DISM /online /cleanup-image /RestoreHealthAttachments
Hi,
Step 1. Start the
 Farbar Recovery Scan Tool again.
Warning: This script was written specifically for this system. Do not run this script on another system.
Step 2. Run the following DISM command and attach a new copy of the CBS log.
Step 1. Start the
Warning: This script was written specifically for this system. Do not run this script on another system.
- Download the attachment fixlist.txt and save it to your desktop.
- Right-click on FRST.exe and select "Run as administrator".
- Press the Fix button.
- If for some reason the tool needs a restart, please make sure you let the system restart normally.
- When finished, a log called Fixlog.txt will appear in the same directory the tool is run from.
- Post the logfile Fixlog.txt as attachment in your next reply.
Step 2. Run the following DISM command and attach a new copy of the CBS log.
Code:
DISM /online /cleanup-image /RestoreHealthAttachments
Still no progress, so I think it would be better to perform a repair install (in-place-upgrade) using the Windows Server 2016 ISO.
In-place upgrade Server 2016
In-place upgrade Server 2016
- Mount the Windows Server ISO and run Setup.exe.
- Use the option Download and install updates, drivers (recommended) and click Next.
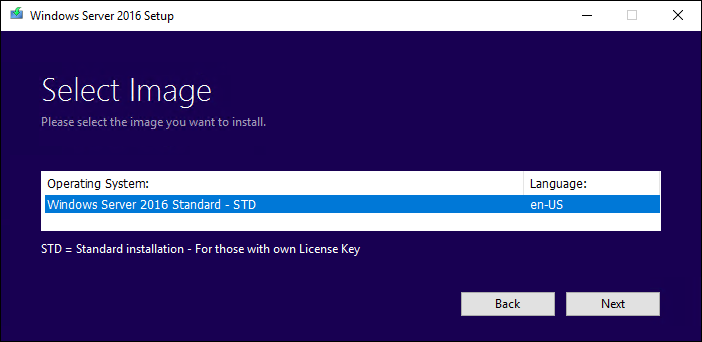
- In the next screen select the image you want to install.

- Depending on your Windows Server version and license, you may see a screen prompting you to enter the licensing key.
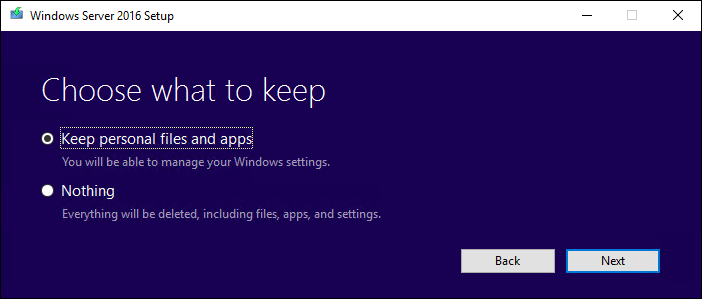
- Then accept the EULA. To perform a in-place upgrade, you need to check keep personal files and apps. Then click Next.

- After clicking Next, an upgrade process will start checking for updates, when this is ready click install to start the in-place upgrade.
It shouldn't be a problem, but you can always clone the current server to test the in-place-upgrade in that environment first.
You're welcome. And let me know the result...
Has Sysnative Forums helped you? Please consider donating to help us support the site!

