Navigation
Install the app
How to install the app on iOS
Follow along with the video below to see how to install our site as a web app on your home screen.
Note: This feature may not be available in some browsers.
More options
You are using an out of date browser. It may not display this or other websites correctly.
You should upgrade or use an alternative browser.
You should upgrade or use an alternative browser.
[SOLVED] Install error - 0x800703f1
- Thread starter Spaazss
- Start date
Please open an elevated prompt, run the following commands and post the result.
Code:
net stop wuauserv
net stop bits
ren %systemroot%\SoftwareDistribution SoftwareDistribution.old
net start wuauserv
net start bits
Spaazss
Active member
- Jul 1, 2024
- 25
Hey,
I am able to complete the commands successfully:
C:\Users\sande>net stop wuauserv
The Windows Update service is stopping.
The Windows Update service was stopped successfully.
C:\Users\sande>net stop bits
The Background Intelligent Transfer Service service is stopping..
The Background Intelligent Transfer Service service was stopped successfully.
C:\Users\sande>ren %systemroot%\SoftwareDistribution SoftwareDistribution.old
C:\Users\sande>net start wuauserv
The Windows Update service is starting.
The Windows Update service was started successfully.
C:\Users\sande>net start bits
The Background Intelligent Transfer Service service is starting..
The Background Intelligent Transfer Service service was started successfully.
What would be the next step? Reboot and try downloading it again?
Yes, reboot the system and attempt to update again and let me know the result...
Please try the following tool.
Download the
 Windows 11 Installation Assistant to your desktop.
Download the

- Right-click on Windows11InstallationAssistant.exe and select the option: Run as administrator.
- Press the Update now button, click after the compatibility check on Next.
- The Update Assistant will now download the latest Feature Update.
- After verifying the download, the Feature Update will be installed.
- When this process is ready, click on the Restart now button to complete the installation.
Hi,
When this screen appears let it run till the system will reboot again. If it's back into Windows provide the following log files.
Upload a copy of the CBS folder

Upload the setupapi.dev.log file

When this screen appears let it run till the system will reboot again. If it's back into Windows provide the following log files.
Upload a copy of the CBS folder
- Open Windows Explorer and browse to the C:\Windows\Logs folder.
- Right-click on the CBS folder and choose Send to > Compressed (zipped) folder.
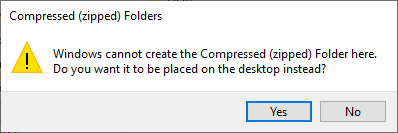
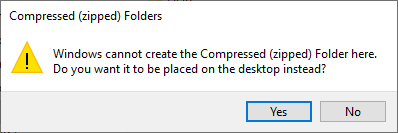
- Now the message will appear, "Windows cannot create the Compressed (zipped) Folder here. Do you want it to be placed on the desktop instead?"
- Click on the Yes button here.

- Attach the file CBS.zip to your next reply. If the file is too large to attach, upload the CBS.zip file to www.wetransfer.com and post the link in your next reply.
Upload the setupapi.dev.log file
- Open Windows Explorer and browse to the C:\Windows\INF folder.
- Right-click on the file setupapi.dev.log and choose Send to > Compressed (zipped) folder.
- Now the message will appear, "Windows cannot create the Compressed (zipped) Folder here. Do you want it to be placed on the desktop instead?"
- Click on the Yes button here.

- Attach the file setupapi.dev.zip in your next reply.
Spaazss
Active member
- Jul 1, 2024
- 25
Hey!
Here is the link to the CBS folder.
I found a couple of setupapi.dev.log 's I think from earlier attempts to fix it.
In case it could be of help I've also included the 2 other recent ones.
Thanks for all the help already :)
Have a great day.
(My apologies for the sporadic replies as well, I am travelling quite a bit and internet is sometimes scarce).
Attachments
Hi,
Have you restored an backup or something else?
Have you restored an backup or something else?
Download
 SetupDiag naar het bureaublad.

- Maak een nieuwe map aan (b.v. SetupDiag) en plaats hier het bestand in.
- Klik met de rechtermuisknop op SetupDiag.exe en kies de optie als administrator uitvoeren.
- Wanneer de tool gereed is worden er drie bestanden aangemaakt.
- Upload het bestand Logs.zip naar www.filedropper.com en plaats de downloadlink in het volgende bericht.
Spaazss
Active member
- Jul 1, 2024
- 25
Als ik deze stappen uitvoer en het programma met amdinrechten uitvoer springt er een scherm open dat meteen weer verdwijnt zonder mij bestanden achter te laten.
Na wat documentatie te lezen kan ik achterhalen dat ik via de command line wat meer opties heb.
Met het standaart commando vind hij blijkbaar geen logfiles.
Van het programma gewoon uit te voeren zonder dat ik bestanden krijg heb ik wel dit kunnen vinden:

Ik zal deze in kopie steken.
Na wat documentatie te lezen kan ik achterhalen dat ik via de command line wat meer opties heb.
Met het standaart commando vind hij blijkbaar geen logfiles.
Code:
PS C:\Users\sande\OneDrive\Desktop\setupdiag> .\SetupDiag.exe /Scenario:Recovery /Format:xml

SetupDiag v1.7.0.0
Copyright (c) Microsoft Corporation. All rights reserved.

Searching for setup logs...
SetupDiag was unable to find a relevant log file.  Exiting!
PS C:\Users\sande\OneDrive\Desktop\setupdiag>
Van het programma gewoon uit te voeren zonder dat ik bestanden krijg heb ik wel dit kunnen vinden:
Ik zal deze in kopie steken.
Attachments
Please upload a new copy of the COMPONENTS hive.
Upload de COMPONENTS hive.
Upload de COMPONENTS hive.
- Open de Windows Verkenner en blader naar de map C:\Windows\System32\config
- Selecteer het bestand COMPONENTS en kopieer dit naar je bureaublad.
Let op: Indien je een melding krijgt dat het bestand in gebruik is, herstart dan je computer en probeer het nogmaals. - Rechtsklik op het bestand COMPONENTS op je bureaublad en kies Kopiëren naar... - Gecomprimeerde (gezipte) map.
- Upload het bestand COMPONENTS.ZIP naar WeTransfer - Send Large Files & Share Photos Online - Up to 2GB Free en plaats de downloadlink in het volgende bericht.
Step 1. Replace Components Hive Manually
Warning: this fix is specific to the user in this thread. No one else should follow these instructions as it may cause more harm than good. If you are after assistance, please start a thread of your own.
Step 2. Reboot the system and run the following DISM command and post the result. If it fails attach a new copy of the CBS log.
Warning: this fix is specific to the user in this thread. No one else should follow these instructions as it may cause more harm than good. If you are after assistance, please start a thread of your own.
- Download COMPONENTS.ZIP and save to your desktop.
- Right-click on it and select Extract all.... Make sure the "Show extracted files when complete" is checked and click Extract.
- Now we have the COMPONENTS file that we will be using to replace your current one.
- Navigate to C:\Windows\System32\config
- Right-click on the current COMPONENTS file and select rename. Rename it to COMPONENTS.bad.
Note: If you get an error that the file is in use, reboot your computer and then try again. - Take the file from the Components folder on your desktop and paste it into C:\Windows\System32\config
Step 2. Reboot the system and run the following DISM command and post the result. If it fails attach a new copy of the CBS log.
Code:
DISM /online /cleanup-image /RestoreHealthAttachments
No problem here when I download the attached COMPONENTS.zip file. I have uploaded the file at WeTransfer as well: COMPONENTS.zip
Spaazss
Active member
- Jul 1, 2024
- 25
Okay so I was able to open it with the WeTransfer.
The DISM fails as follows:
Here is the CBS log.
The DISM fails as follows:
Code:
[===========================91.5%=====================     ]
[===========================91.8%=====================     ]
[===========================92.2%=====================     ]
[==========================100.0%==========================]
Error: 0x800f081f

The source files could not be found.
Use the "Source" option to specify the location of the files that are required to restore the feature. For more information on specifying a source location, see https://go.microsoft.com/fwlink/?LinkId=243077.

The DISM log file can be found at C:\WINDOWS\Logs\DISM\dism.log
PS C:\Users\sande>
Here is the CBS log.
Great, here's the next fix.
Step 1.
Warning: This fix was written specifically for this system. Do not run this fix on another system.

Step 2. Run the following DISM command and post the result. If it fails attach a new copy of the CBS log.
Step 1.
Warning: This fix was written specifically for this system. Do not run this fix on another system.
- Save any work you have open, and close all programs.
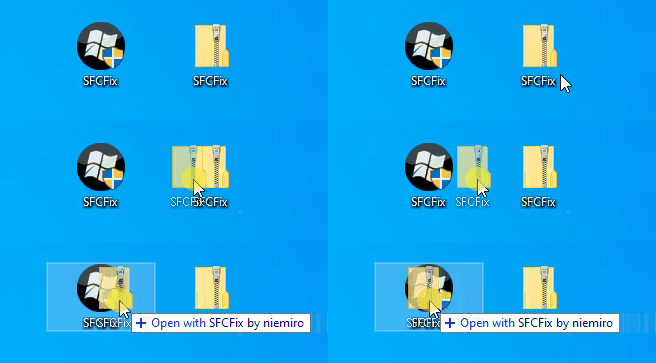
- Download the attachment SFCFix.zip and save it to your desktop.
- Drag the SFCFix.zip file over the SFCFix.exe executable and release it.

- SFCFix will launch, let it complete.
- Once done, a file will appear on your desktop, called SFCFix.txt.
- Post the logfile (SFCFix.txt) as attachment in your next reply.
Step 2. Run the following DISM command and post the result. If it fails attach a new copy of the CBS log.
Code:
DISM /online /cleanup-image /RestoreHealthAttachments
Has Sysnative Forums helped you? Please consider donating to help us support the site!


