Server 2016 Standard - WU/DISM/SFC failing

Hi,

Step 1.
Warning: This fix was written specifically for this system. Do not run this fix on another system.
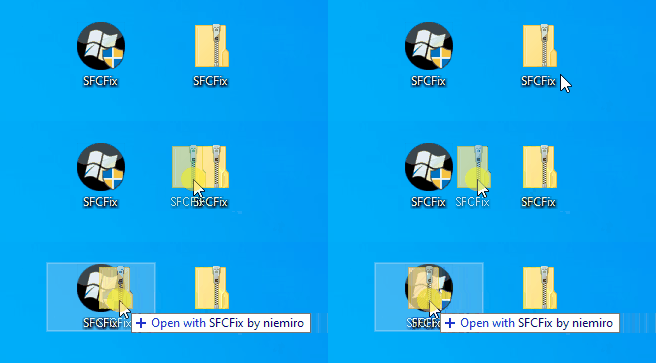
  • Save any work you have open, and close all programs.
  • Download the attachment SFCFix.zip and save it to your desktop.
  • Drag the SFCFix.zip file over the SFCFix.exe executable and release it.
6190d993a26f3-SFCFix-Zip-Eng.gif

  • SFCFix will launch, let it complete.
  • Once done, a file will appear on your desktop, called SFCFix.txt.
  • Post the logfile (SFCFix.txt) as attachment in your next reply.


Step 2. Run the following DISM command and post the result. If it fails attach a new copy of the CBS log.
Code:
DISM /online /cleanup-image /RestoreHealth
 

Attachments

Hello.

Code:
[==========================100.0%==========================]
Error: 0x800f081f
The source files could not be found.
 

Attachments

Step 1.
Warning: This fix was written specifically for this system. Do not run this fix on another system.
  • Save any work you have open, and close all programs.
  • Download the attachment SFCFix.zip and save it to your desktop.
  • Drag the SFCFix.zip file over the SFCFix.exe executable and release it.
6190d993a26f3-SFCFix-Zip-Eng.gif

  • SFCFix will launch, let it complete.
  • Once done, a file will appear on your desktop, called SFCFix.txt.
  • Post the logfile (SFCFix.txt) as attachment in your next reply.


Step 2. Run the following DISM command and post the result. If it fails attach a new copy of the CBS log.
Code:
DISM /online /cleanup-image /RestoreHealth
 

Attachments

Code:
[==========================100.0%==========================]
Error: 0x800f081f
The source files could not be found.
 

Attachments

I wonder how many fixes are needed before DISM will report: "Completed Succesfully"?....

Step 1.
Warning: This fix was written specifically for this system. Do not run this fix on another system.
  • Save any work you have open, and close all programs.
  • Download the attachment SFCFix.zip and save it to your desktop.
  • Drag the SFCFix.zip file over the SFCFix.exe executable and release it.
6190d993a26f3-SFCFix-Zip-Eng.gif

  • SFCFix will launch, let it complete.
  • Once done, a file will appear on your desktop, called SFCFix.txt.
  • Post the logfile (SFCFix.txt) as attachment in your next reply.


Step 2. Run the following DISM command and post the result. If it fails attach a new copy of the CBS log.
Code:
DISM /online /cleanup-image /RestoreHealth
 

Attachments

It seems I have (almost) all the files on my VM's reported into the CBS log, and we're not in a loop, because each time other files are missing.

This means:
1. The Components Store (WinSxS folder) is missing a huge number of files.
2. This may also relate to the registry and/or the COMPONENTS hive which is missing a lot of keys.

I have to honestly admit that this is the first case I've seen a DISM result with 100% but still says 0x800f081f after each fix... But perhaps is has to due with some truncation issue, each time the CBS.log cut off the latest line, and does not give a complete SURT result after running DISM.

Rich (BB code):
Repair failed: Missing replacement manifest.
(p)    CSI Manifest Corrupt            amd64_e57f6c039b58c92dc0e90bf85886a57e_31bf3856ad364e35_10.0.14393.2969_none_c3f11a2f63291389
Repair failed: Missing replacement manifest.
(p)    CSI Manifest Corrupt            amd64_e592ccb2a4d52a845ee546ccd4e30d5b_31bf3856ad364e35_10.0.14393.3297_none_4e2cb30a40

Question: Is this server still connected to an WSUS server in your network?
 
Hello.

This server, as far as I am aware, has never used WSUS. It uses Windows Update directly. Have you seen otherwise in the logs?

Regarding truncation. Perhaps deleting cbs.log before the next time DISM is ran might help. I suspect not, but it might be worth considering.
 
Last edited:
Just ran sfcfix.exe with the latest sfcfix.zip, as I cannot remember if I had done so yet, so the attached cms.log might include the same results as yesterday.
 

Attachments

Here's the next fix.

Step 1.
Warning: This fix was written specifically for this system. Do not run this fix on another system.
  • Save any work you have open, and close all programs.
  • Download the attachment SFCFix.zip and save it to your desktop.
  • Drag the SFCFix.zip file over the SFCFix.exe executable and release it.
6190d993a26f3-SFCFix-Zip-Eng.gif

  • SFCFix will launch, let it complete.
  • Once done, a file will appear on your desktop, called SFCFix.txt.
  • Post the logfile (SFCFix.txt) as attachment in your next reply.


Step 2. Run the following DISM command and post the result. If it fails attach a new copy of the CBS log.
Code:
DISM /online /cleanup-image /RestoreHealth
 

Attachments

Hi,

Here's the next fix.

Step 1.
Warning: This fix was written specifically for this system. Do not run this fix on another system.
  • Save any work you have open, and close all programs.
  • Download the attachment SFCFix.zip and save it to your desktop.
  • Drag the SFCFix.zip file over the SFCFix.exe executable and release it.
6190d993a26f3-SFCFix-Zip-Eng.gif

  • SFCFix will launch, let it complete.
  • Once done, a file will appear on your desktop, called SFCFix.txt.
  • Post the logfile (SFCFix.txt) as attachment in your next reply.


Step 2. Run the following DISM command and post the result. If it fails attach a new copy of the CBS log.
Code:
DISM /online /cleanup-image /RestoreHealth
 

Attachments

Has Sysnative Forums helped you? Please consider donating to help us support the site!

Back
Top