Navigation
Install the app
How to install the app on iOS
Follow along with the video below to see how to install our site as a web app on your home screen.
Note: This feature may not be available in some browsers.
More options
You are using an out of date browser. It may not display this or other websites correctly.
You should upgrade or use an alternative browser.
You should upgrade or use an alternative browser.
[SOLVED] Unable to do windows update on Windows server 2016 with error 0x80246002
- Thread starter joythomas
- Start date
Hi,
Unfortunately, the bootlog is corrupted!
... but please do the following.
Right-click on the file
 FRST64.exe and choose Run as administrator.
Unfortunately, the bootlog is corrupted!
Rich (BB code):
---------------------------
The file 'C:\Users\<username>\Desktop\Joythomas\Bootlog.pml' was not closed cleanly during capture and is corrupt.
---------------------------
... but please do the following.
Right-click on the file

- Copy and paste the following (code) into the Search box and click the Search Files button.
Code:
bfsvc.dll- When the scan is complete, a message will display that 'Search.txt' is saved in the same folder FRST was started from. Notepad will open this file also.
- Post the logfile Search.txt as attachment in your next reply.
Hi,
Run the following DISM command and post the result. If it fails attach a new copy of the CBS log.
Run the following DISM command and post the result. If it fails attach a new copy of the CBS log.
Code:
DISM /online /cleanup-image /RestoreHealthDISM /online /cleanup-image /RestoreHealth - It completed without any errors.
C:\Windows\system32>DISM /online /cleanup-image /RestoreHealth
Deployment Image Servicing and Management tool
Version: 10.0.14393.4169
Image Version: 10.0.14393.4169
[==========================100.0%==========================] The restore operation completed successfully.
The operation completed successfully.
Open an elevated command prompt and run the following command. Attach Dirlist.txt to your next post.
Code:
dir /s /a %systemroot%\WinSxS\amd64_microsoft-windows-servicingstack_31bf3856ad364e35_10.0.14393.6700_none_7edb674a220f1eb8 > "%userprofile%\Desktop\Dirlist.txt"Please do the following.
Warning: This fix was written specifically for this system. Do not run this fix on another system.

Afterwards reboot the server and attempt to update again. If it fails attach a new copy of the CBS logs.
Warning: This fix was written specifically for this system. Do not run this fix on another system.
- Save any work you have open, and close all programs.
- Download the attachment SFCFix.zip and save it to your desktop.
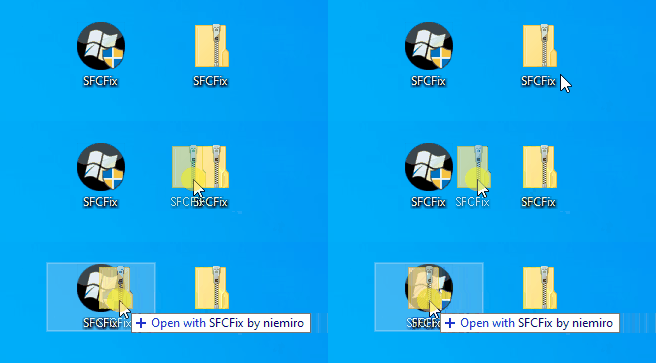
- Drag the SFCFix.zip file over the SFCFix.exe executable and release it.

- SFCFix will launch, let it complete.
- Once done, a file will appear on your desktop, called SFCFix.txt.
- Post the logfile (SFCFix.txt) as attachment in your next reply.
Afterwards reboot the server and attempt to update again. If it fails attach a new copy of the CBS logs.
Attachments
1. This error occurs when your try to update from the WSUS Server (http://localhost:8005) 0x80246002 - WU_E_DM_INCORRECTFILEHASH
2. When you try to install the latest LCU with DISM it fails after a reboot with error 0x8007007e - ERROR_MOD_NOT_FOUND
Both errors are actually the same since the issue has to do with Servicing Stack corruptions.
Warning: This fix was written specifically for this system. Do not run this fix on another system.

Afterwards reboot the server and attempt to update again. If it fails attach a new copy of the CBS logs.
2. When you try to install the latest LCU with DISM it fails after a reboot with error 0x8007007e - ERROR_MOD_NOT_FOUND
Both errors are actually the same since the issue has to do with Servicing Stack corruptions.
Warning: This fix was written specifically for this system. Do not run this fix on another system.
- Save any work you have open, and close all programs.
- Download the attachment SFCFix.zip and save it to your desktop.
- Drag the SFCFix.zip file over the SFCFix.exe executable and release it.

- SFCFix will launch, let it complete.
- Once done, a file will appear on your desktop, called SFCFix.txt.
- Post the logfile (SFCFix.txt) as attachment in your next reply.
Afterwards reboot the server and attempt to update again. If it fails attach a new copy of the CBS logs.
Attachments
Please do the following again.
Follow these instructions to install an update with DISM.
Follow these instructions to install an update with DISM.
- Open the Start menu of Windows and type CMD.
- When you see Command Prompt on the list, select the option Run as administrator.
- Copy and paste the following command into it, and press enter. (Leave the CMD window open!)
Code:
MD C:\WUTemp- Now, download the following update (KB5034767) to: C:\WUTemp - Or copy this file from the download directory to C:\WUTemp. (Important!)
Downloadlink: KB5034767 - Copy and paste the following commands one at a time into the command prompt and press enter after each.
Code:
CD C:\WUTemp
EXPAND.exe windows10.0-kb5034767-x64_f9031d7e8a8d79d1b6c51ded2dd22527eebacdc2.msu -f:* C:\WUTemp
DISM.exe /Online /Add-Package /PackagePath:C:\WUtemp\Windows10.0-KB5034767-x64.cab- Let me know if it says it was successful or if there are any errors. Or take a screenshot of the command prompt window and paste it into your next reply.
Please attach the CBS logs again to review.
Upload a copy of the CBS folder

Upload a copy of the CBS folder
- Open Windows Explorer and browse to the C:\Windows\Logs folder.
- Right-click on the CBS folder and choose Send to > Compressed (zipped) folder.
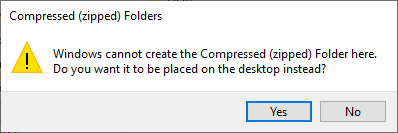
- Now the message will appear, "Windows cannot create the Compressed (zipped) Folder here. Do you want it to be placed on the desktop instead?"
- Click on the Yes button here.

- Attach the file CBS.zip to your next reply. If the file is too large to attach, upload the CBS.zip file to www.wetransfer.com and post the link in your next reply.
Rich (BB code):
2024-02-23 12:54:19, Info                  CSI    00000126 Cannot fetch manifest for Microsoft-Windows-ServicingStack-Boot-Onecore, version 10.0.14393.6700, arch amd64, nonSxS, pkt {l:8 b:31bf3856ad364e35}, the component is not staged
2024-02-23 12:54:19, Error                 CSI    00000127@2024/2/23:17:54:19.230 (F) onecore\base\wcp\library\manifestcache.cpp(117): Error HRESULT_FROM_WIN32(ERROR_SXS_ASSEMBLY_NOT_FOUND) originated in function CManifestCache::FetchManifestFromStore expression: HRESULT_FROM_WIN32(14003L)
[gle=0x80004005]
Hi,
Please run the following command in an elevated prompt and copy and past the result in your next post.
Code:
certutil -hashfile C:\Windows\WinSxS\Manifests\amd64_microsoft-windows-s..gstack-boot-onecore_31bf3856ad364e35_10.0.14393.6700_none_cb4329d2cb3fac0f.manifest SHA256Result..
C:\Windows\system32>certutil -hashfile C:\Windows\WinSxS\Manifests\amd64_microsoft-windows-s..gstack-boot-onecore_31bf3856ad364e35_10.0.14393.6700_none_cb4329d2cb3fac0f.manifest SHA256
SHA256 hash of file C:\Windows\WinSxS\Manifests\amd64_microsoft-windows-s..gstack-boot-onecore_31bf3856ad364e35_10.0.14393.6700_none_cb4329d2cb3fac0f.manifest:
f19da8d5eadf04396cc40e35564582cff9d8de256df97b4d1bf191e1cac448fd
CertUtil: -hashfile command completed successfully.
Hi,
Please perform the instructions in post #39 again with Process Monitor running. Without a working bootlog-trace it is difficult to determine the corruption.
Capture Process Monitor BootLog
1. Download and run Process Monitor. Leave this running while you perform the next steps.
2. Select the Options....Enable Boot Logging option. A Enable Boot Logging dialog will come up. Just click OK.
3. Create a folder on your desktop named BootLog.
4. Attempt to install the update just like you have in the past. Let the machine reboot and revert just like it has in the past.
5. After the machine has rebooted and come back up to the desktop, open Process Monitor again. A message box will come up telling you that a log of boot-time activity was created and ask if you wish to save it. Click Yes and save to the BootLog folder on your desktop.
6. This may take some time as it converts the boot-time data. Allow it to finish.
7. Zip up the entire BootLog folder on your desktop and upload to a file sharing service like: WeTransfer - Send Large Files & Share Photos Online - Up to 2GB Free
8. Attach also a new copy of the current CBS logs for the time stamps.
Installation of the update completed 100 % but the changes reverted back during the reboot (after completing 35%). Bootlog attached.
Link bootlog.zip
Link bootlog.zip
Has Sysnative Forums helped you? Please consider donating to help us support the site!

